![]()
Raspberry Pi 3 Model B
Raspberry Pi is a smaller single board computer developed by the Raspberry Pi Foundation. It is encouraged in the schools in developing the basic computer knowledge to the student and instead of knowledge to developing the country. Which is applied to show the robotic technology easier and to control the household equipment through the internet with single board computer. It was emerging components and evolving technology in the universe. Some other external sensor to control and access the so many of the components. Several generations of Raspberry Pis have been discharged. 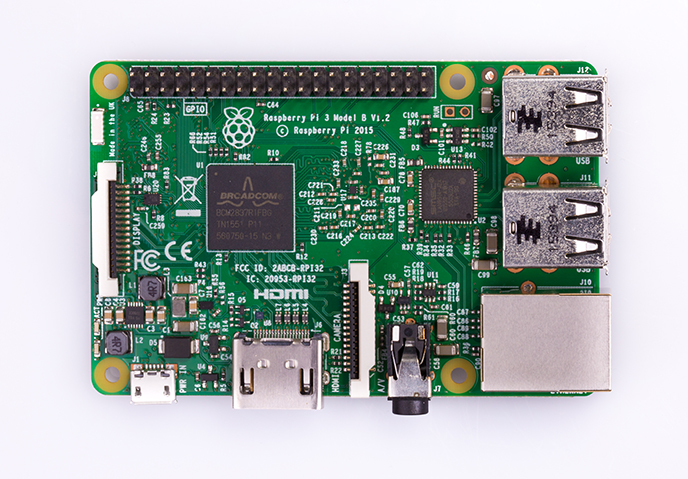
Type of generation:
- Raspberry Pi 1 Model A+ (The GPIO header has grown to 40 pins, while retaining the same pinout for the first 26 pins as the Model A and B. Micro SD, Better audio, Low power consumption. neater factor)
- Raspberry Pi 1 Model B+ (More GPIO, More USB, Micro SD, Better audio, Low power consumption)
- Raspberry Pi 2 Model B (quad-core ARM, 1GB RAM)
- Raspberry Pi Zero is half the size of a Model A+, with twice the utility.
- Raspberry Pi 3 is the third generation Raspberry Pi. It replaced the Raspberry Pi 2 Model B in February 2016. (1.2GHz 64-bit quad-core ARMv8 CPU,802.11n Wireless LAN,Bluetooth 4.1,Bluetooth Low Energy (BLE))
GPIO Pins

- GPIO – General Purpose Input and output pin to create a program and can control anything.
- BCM – Broadcom pin number, commonly called “GPIO”.
- GPIO – 4,11,12,13,15,16,18,22,29,31,32,33,35,36,37,38,40
- Reserved – 27,28
- GND Pin No – 6,9,14,20,25,30,34,39
- PWR 3.3V Pin No – 1,17
- PWR 5V Pin No – 2,4
UART (Universal asynchronous receiver/transmitter) interface is used for sending and receiving data over a data line and forms the standard of the serial ports on PCs and micro controllers. It is the Part of IC (integrated Circuit). Common Interface is RS-232 and EIA-485.
- UARTO TX – 8
- UARTO RX – 10
Serial Peripheral Interface (SPI) is an interface bus commonly used to send data between micro controllers and small peripherals such as shift registers, sensors, and SD cards
- MOSI – Master Out Slave In – 19
- MISO – Master In Slave Out – 21
- SCLK – Serial Clock – 23
- CS – Chip Select – 24,26
I2C is a useful bus that allows data exchange between micro controllers and peripherals with a minimum of wiring.
The Inter-integrated Circuit (I2C) Protocol is a protocol intended to allow multiple “slave” digital integrated circuits (“chips”) to communicate with one or more “master” chips. Like the Serial Peripheral Interface (SPI), it is only intended for short distance communications within a single device. Like Asynchronous Serial Interfaces (such as RS-232 or UARTs), it only requires two signal wires to exchange information.
Power Adapter : DC 2 A or 2.5 A will use cell phone charger 5v (or) adapter.
Operating System
Raspberry pi default OS is Raspbian. But you want no of OS installs in a single board.
Have to use NOOBS. NOOBS (New Out Of Box Software) is an application to install the multiple OS.
- Linux
- OSMC
- Open ELEC
- Retro PIE
- RISC OS
- FireFox OS
- RaspAnd
- Andriod 4.0 Is coming soon
SD Card formatter and Image file writer
Before copying the image file. Need to format the SD card using below application.
- 7Zip
- SD Card Formatter
- Win 32 Disk Image
- PetRockBlog
Programming Language
Below programming technology to interface the raspberry pi board and other sensor.
- Python
- Java (http://pi4j.com/example/control.html)
- Perl
- PHP and more
Installation Overview
- For installation of NOOBS, the minimum recommended card size is 8GB
- For image installations we recommend a minimum of 4GB.
- Class 10 SD cards are used in video equipment since they can transfer data quickly with no buffering.
- A class 10 should be able to attain 10 MB/s. However, it should be noted that this does not mean a class 10 card will outperform a class 4 card for general usage, because often this write speed is achieved at the cost of read speed and increased seek times.
- The largest sized MicroSD card a Raspberry Pi can use is listed as 32 GB although some forums have people talking about using a 64GB SD card with no problems.
Software Installation
- Download the NOOBS (or) Raspbian OS. Downloaded files are in zip file. So Extract the zip file and get the .image file.
- Format the SD card.
- Copy the image file and paste it in the raspberry pi SD card.
- Once you’ve flashed the disk image using the methods above, place the SD card into your Raspberry Pi, plug in the HDMI monitor, any keyboards and mice, and then the power cable. Your Raspberry Pi should begin to boot and you should be able to see Raspbian on your screen.
Installing
After following the above step to add the image file on the SD card. Below, like window show on the monitor, then will you choose the rasbian to install the OS.
Note: No folder creation to paste your image file. Because boot file not recognized. Just copy and paste the image file.

If you want any details about the documentation do not hesitate to ask me or comment it below. Thanks for reading, your welcome.
